Learning how to program is no longer as hard as it used to be. I first became interested in programming in the mid-’90s, but back then, setting up a programming environment was a daunting task. I struggled for years to follow the poorly documented appendix sections in programming books. It always felt like those electrical power poles with the first 12 feet of the ladder removed. If only I could reach that level, I could climb to the top, but the most crucial section was always out of reach.
Fast forward to 2025, and setting up a Windows 11 PC for programming takes about five minutes. It’s so easy that anyone can do it! Here are the steps:
Step 1: Open PowerShell as Administrator
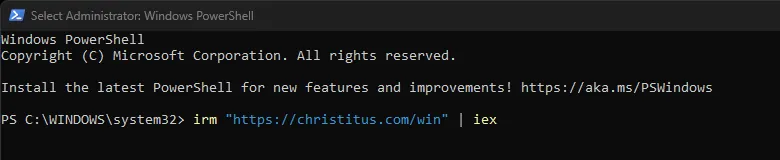
First, open PowerShell with administrator privileges. This is important for installing tools seamlessly. In the PowerShell window, enter the following command to run Chris Titus’s amazing Windows Utility:
Caution: Be careful when entering PowerShell commands from websites, including mine. Always verify commands from trusted sources like Chris’s website to avoid potential risks. We live in increasingly dangerous times, so never let your guard down.
This command will download and execute the utility.
irm "https://christitus.com/win" | iex
Step 2: Install Python
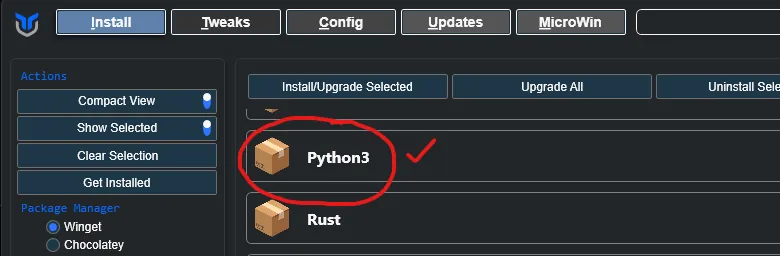
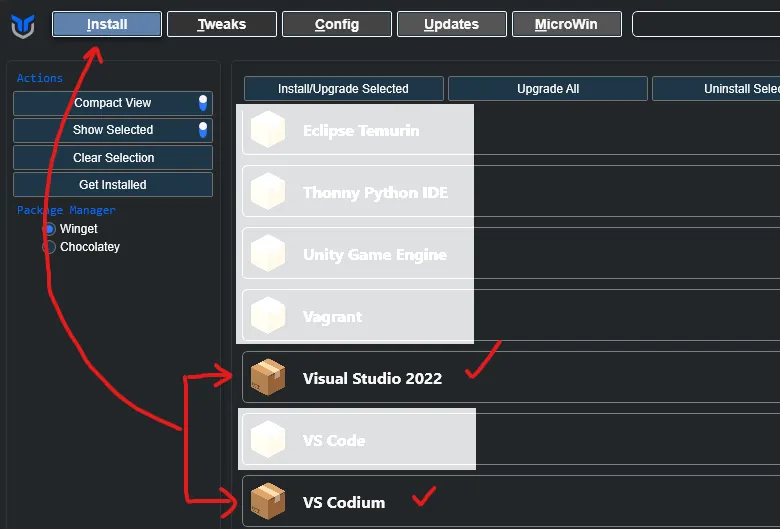
Once the GUI loads, navigate to the Install section. From there, go to the Programming Tools section and check Python. In the Editors section, you can choose either Visual Studio or, in my case, VSCodium. Click Install, and in about a minute, you’ll have a perfectly integrated Python programming setup.
Installing the Python Extension
After opening Visual Studio or VSCodium, install the Python extension to enhance your programming experience. This extension adds features like IntelliSense, debugging tools, and more.
To install the Python extension:
- Open Visual Studio or VSCodium.
- Go to the Extensions menu.
- Select Manage Extensions (for Visual Studio) or Install Extensions (for VSCodium).
- Search for Python in the search bar.
- Look for the extension with the most installs—this is the official one by Microsoft. Click Install and restart the editor if prompted.
Step 3: Test Your Setup
If you’ve followed my advice, you now have a ready-to-go Python setup. To test it, open the programming editor you just installed and type in this simple Python program:
a = 100
b = 100
c = 200
if a + b == c:
    print("Correct!")
For a bit more complexity, replace the print line with this:
print(f"{a} plus {b} is equal to {c}.")Press Run to see the output. If everything is set up correctly, you’ll see your message displayed.
Visual Studio vs. VSCodium
As a final note, you might wonder about the difference between Visual Studio and VSCodium:
- Visual Studio: A comprehensive IDE primarily for larger projects and enterprise development, featuring advanced debugging and profiling tools.
- VSCodium: A lightweight, open-source version of Visual Studio Code, stripped of telemetry and Microsoft’s branding. It’s perfect for those who prefer a minimalist approach while retaining essential features.
Conclusion
Now that you have a solid Python development setup, you’re ready to begin your programming journey. I hope this mini-tutorial inspires you to explore the easy-to-learn Python programming language and unleash your creativity!