Introduction
In this tutorial, we’ll walk through the steps to install and set up Flask, a popular Python web framework, on a Proxmox server using LXC containers. Flask is known for its simplicity and ease of use, making it a great choice for those new to web development with Python.
Prerequisites
- Proxmox Server: Ensure you have a Proxmox server set up and running.
- LXC Container: You should have an LXC container created in Proxmox where you will install Flask.
- Basic Knowledge of Linux: Familiarity with Linux commands and concepts is helpful.
Step 1: Create an LXC Container
- Log into Proxmox Web Interface:
- Open your web browser and navigate to your Proxmox server’s IP address.
- Log in using your Proxmox credentials.
- Create a New Debian 12 LXC Container:
- Click on “Create CT” in the top right corner.
- Follow the wizard to set up your container:
- General: Enter a hostname and choose the debian 12 template. A minimal Debian or Ubuntu template is recommended.
- Root Disk: Allocate disk space for your container.
- CPU and Memory: Allocate resources according to your needs.
- Network: Configure network settings (e.g., bridge mode).
- Click “Finish” to create the container.
- Start the Container:
- Once the container is created, start it by selecting it and clicking “Start.”
Step 2: Access the LXC Container
- Open a Terminal:
- You can use the Proxmox web interface to open a shell for the container or SSH into it.
- Log in to the Container:
- Use the root credentials you set during container creation.
Step 3: Install Python and Flask
- Update Package Lists:
apt update
- Install Python and Flask:
apt install python3 python3-flask
Step 4: Create a Simple Flask Application
- Create a Directory for Your Flask App:
mkdir ~/flask_app
cd ~/flask_app
- Create a Flask Application File:
- Create a file named
app.pywith the following content:
- Create a file named
from flask import Flask

app = Flask(__name__)

@app.route('/')
def home():
    return 'Hello, Flask!'

if __name__ == '__main__':
    app.run(host='0.0.0.0', port=5000)
To create something more advanced than the “Hello Flask” page, replace the existing code in your
app.pyfile with the following code:
import random
from flask import Flask, render_template_string
app = Flask(__name__)
quotes = [
"The only way to do great work is to love what you do. – Steve Jobs",
"Success is not the key to happiness. Happiness is the key to success. – Albert Schweitzer",
"Don't watch the clock; do what it does. Keep going. – Sam Levenson"
]
@app.route('/')
def home():
random_quote = random.choice(quotes)
template = '''
<html>
<head>
<meta http-equiv="Cache-Control" content="no-store" />
<title>Congratulations on Finishing Your First Flask App!</title>
<style>
body {
font-family: Arial, sans-serif;
background-color: #f9f9f9;
margin: 0;
padding: 20px;
text-align: center;
}
h1 {
color: #4CAF50;
}
.section-title {
font-size: 24px;
color: #333;
margin-bottom: 10px;
}
.quote {
font-size: 22px;
color: #555;
font-style: italic;
margin: 20px 0;
}
.instructions {
font-size: 18px;
color: #777;
}
.outro {
font-size: 18px;
color: #333;
margin-top: 40px;
}
</style>
</head>
<body>
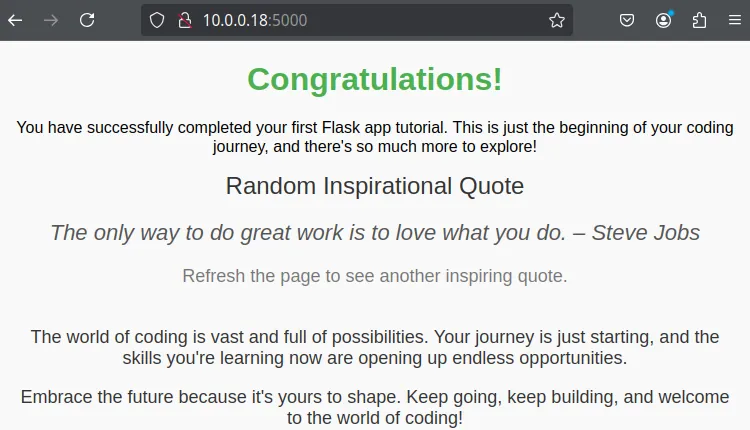
<h1>Congratulations!</h1>
<p>You have successfully completed your first Flask app tutorial. This is just the beginning of your coding journey, and there's so much more to explore!</p>
<div class="section-title">Random Inspirational Quote</div>
<div class="quote">{{ random_quote }}</div>
<div class="instructions">Refresh the page to see another inspiring quote.</div>
<div class="outro">
<p>The world of coding is vast and full of possibilities. Your journey is just starting, and the skills you're learning now are opening up endless opportunities.</p>
<p>Embrace the future because it's yours to shape. Keep going, keep building, and welcome to the world of coding!</p>
</div>
</body>
</html>
'''
return render_template_string(template, random_quote=random_quote)
if __name__ == '__main__':
app.run(host='0.0.0.0', port=5000)- Run the Flask Application:
python3 app.py
- Your Flask app should now be running and accessible via the container’s IP address on port 5000.
Conclusion
Congratulations! You’ve successfully set up Flask on an LXC container in Proxmox. This setup provides a solid foundation for building and deploying Python-based web applications. For more advanced configurations, consider setting up a web server like Nginx to serve your Flask application in production.
If you enjoyed this tutorial and want to explore more, check out our next blog article titled “Creating a Sample Flask Web App for Tracking Updates”. In this continuation, we’ll dive deeper into developing a Flask web app that tracks and manages updates.