Fixing the Windows 11 “Alert” Sound
Windows 11 has its fair share of great features, but let’s face it, sometimes it feels like Microsoft went out of its way to irritate even the most patient users. As a long-time Linux user who recently took the plunge into Windows 11, I was initially optimistic—until I was greeted by the incessant, soul-sucking “ding” sound that occurs every 30 seconds or so when the system is in sleep mode and not being used.
Now, I get it: Windows 11 is designed for a more polished user experience. But let’s be honest: Some of its quirks feel like they were implemented just to drive you mad. While most of the annoying parts can be removed with the excellent Ultimate Windows Utility by Chris Titus (which, by the way, I highly recommend for anyone looking to streamline their system), there are still a few nuisances that require the old-fashioned approach. The “ding” is one of them.
So, if you’ve been experiencing this constant creativity-killing noise that makes you want to pull your hair out, don’t worry. I’ve found the solution, and it’s surprisingly simple. Here’s how to silence that incessant bell:
1) Open the Control Panel

The first step is to open the Control Panel. Microsoft might have buried it deep in the OS (because who needs it, right?), but it’s still there. To access it, just press the Start button, type “Control Panel,” and hit Enter. Simple enough, right?
2) Navigate to “Hardware and Sound”
Once you’re in the Control Panel, look for the Hardware and Sound category. It’s right there with the rest of the settings that Microsoft insists on making slightly more complicated than necessary.
3) Select the Sound Tab
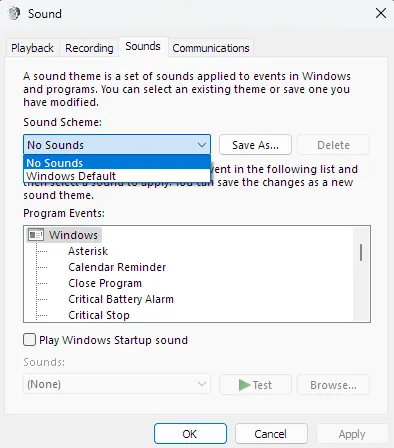
In the Hardware and Sound section, click on the Sound option. This will open a new window where all the system sounds are listed. Now, instead of wasting time figuring out which sound is responsible for the “ding” (because, let’s face it, the sound list is a mess), we’re going to disable all of them.
4) Set the “No Sounds” Scheme

With the Sound window open, click on the Sound tab at the top. Here, you’ll see a dropdown menu called Sound Scheme. From this menu, select the No Sounds option. This will ensure that your computer no longer produces any notification sounds, including the infuriating “ding” you’ve been hearing every 30 seconds. This method silences all system sounds and alerts.
Once selected, press Apply and then OK. That’s it. No more annoying sounds. Your system is now peaceful and quiet.
The Final Verdict
After completing these steps, the constant ding that was driving me mad was finally gone. It’s not the most elegant solution, but it works. Microsoft might not make it easy to turn off every intrusive notification sound, but this little fix will help restore your sanity.
If you’re like me, a Linux user who’s reluctantly testing the waters of Windows 11, you’re probably looking for ways to make this bloated OS more tolerable. While Chris Titus’s Ultimate Windows Utility can get rid of most of the unnecessary bloatware and optimize your system, there are still little annoyances—like the ding—that require a bit of manual intervention.
If you’ve dealt with a similar issue or found a fix that saved your sanity, feel free to leave a comment below. I’m on a mission to make Windows 11 useful for people like me who prefer the stability and simplicity of Linux. It’s a tough job, but someone has to do it.
Stay tuned for more tips on making Windows 11 bearable. It’s easier said than done, but I’ll keep at it.
